Monday, November 22, 2010

Susie Homemaker

On Saturday while Dan was in the hot and sticky attic, I was in the air conditioned house hanging curtain rods.  I’ve got lots of curtains ready to be sewn! Money saving tip: Instead of purchasing pricey curtains, the fabric store just might be the place to go.  And if you really look around, you may even be able to find some great sale or clearance fabrics.  In my case, I found great fabrics at $1 to $1.50 a yard. 
Sometime ago I purchased lots of fabric for curtains in my living room, bedroom, and dining room.  I attempted to sew these curtains and ran across many issues with my sewing machine.  There’s a problem with the tension on my machine that I have yet to resolve and if possible seems only to be growing worse.  I sew only a few centimeters and suddenly the thread is knotted and tangled.  At best it is simply a pain, at worst it can cause holes in the fabric.  I finally gave up trying to use my machine and thanks to Aunt Maggie, I went to her house Thursday night to get started on my curtains.  It ended up being a rather helpful trip as she is somewhat a seamstress and years ago worked in her fathers’ upholstery shop.  And she made my life easier with some great tips and help with measurements where my poor math skills were lacking.  Thanks Aunt Maggie. 

Hole in the wall realities.

About a year and a half ago I was given a beautiful light fixture (I tend to call it a chandelier but it doesn’t have any crystal hanging thingies and therefore I’m not really sure if it qualifies as a chandelier or not) from my cousin Tony.  I intended to put it up in the living room long ago and took down the ceiling fan in preparation for doing so.  Because of other higher priorities (some may call it procrastination but really, who’s keeping track?) a hole with wires in it has been hanging open in my ceiling this whole time. 
The reason I haven't just attached the wiring from the fan to the wiring from the light and had my new lighting up is that it won't work like that. Actually, more accurately it will maybe work, maybe not, but if it does then that is all it will do. ...A light working means it on right? Anyway, what I mean is that the lightswitch on the wall was not connected to the ceiling fan. The fan was controlled by pull cords. Since the light fixture does not have pull cords then attaching it to the wires from the fan will either leave the lights always off or always on. Either way, it's not really what I am aiming for.
So Saturday, I coerced Dan into crawling into the attic for me to run wiring for my chandelier.  The goal was to connect the light switch by the front door to the ceiling lighting so I can control it from there. Especially when I first come in the house. (I am pretty night blind and stumbling around is never fun.) After hours of him in the attic, fiberglass insulation in his arms and chest, communicating by yelling through the ceiling, a 12 by 7 inch hole in my living room wall, there’s still no wires to be found.  We gave up and will now turn to the help of a trained electrician, my cousin Mike.  After that sweaty, itchy, stuffy, hot and frustrating experience poor Dan deserved lots of ice cream, hugs, and thank-you’s.    By the way, the hole was easily patched up and spackled. 

you live, you learm

As I was doing my house repairs, I had the opportunity to do them for a school project as well.  This blog as well as a scrapbook I've been putting together have been just a couple of the fun elements of this school project.  However there is one part that just didn’t want to cooperate.  I’ve taken lots of pictures for visual memories of my journey in home improvement.  But my attempt at videotaping has been less than satisfactory.  There are simple obvious reasons like completely forgetting to video tape(though I did record an hour of a table and wall, and more complicated reasons such as battery failure, lens failure, user malfunction, and tape incompatibilities.  So, after many tries and many failures I’ve scrapped the videotaping and decided there’s no future for me in a career as a videographer. 

Wednesday, November 17, 2010

for the long hall

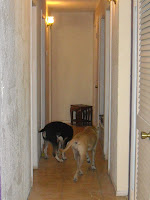
My house layout is in true 70's fashion; the "common areas" (living room, dining room, kitchen) on one side of the house and all bedrooms and bathrooms on the other. Thanks goodness my house isn't too big one might have to sprint down the hall to make it to the facilities. The bedrooms and bathrooms are on the right down a long narrow hall.

Bentley on Left and Kaycee on right
My hopes for this hallway (yes, I even had hopes for the hallway) were to make it a sort of art gallery. I painted the walls the whitest white long ago in hopes of putting great pictures or art all down the length of it. I even bought canvases in hopes of being the next Picasso, but I've yet to be discovered so they are not hanging on the walls.

What I did find was not too long ago at Target were small wall shelves 11" x 4" on sale (same as the box shelves in the bathroom)! I have hung those along the walls (again with Dan's help since I still cannot hang things straight) alternating one higher, the next lower, the next higher...you get it. Because of bedroom doors along the hall walls there are 4 shelves then a door, then 1 shelf then a door then 2 shelves. On these shelves are 5x7 pictures in colorful (imagine that) frames.

On the other side of the hall there is much less wall space for hanging things because of 3 doors and the air conditioning closet. So all I have space for there is a "Let's got for a walk" sign with 3 hooks for the dogs leashes. (that's  Bentley's favorite wall!)

The very back of the wall displays whatever artwork I hang there at the time (I switched it out every so often) and 4 small elephant tables that I love. They were given to me by a coworker.

With a little paint and a few shelves now even my hallway is personalised and enjoyable!

Bathroom spruce up

Face it people, we spend a lot of time in the bathroom. Sometimes we rush in and out to check our hair or faces in the mirror. Sometimes it's an hour long bubble bath. But of course we probably spend the most amount of time just sittin' around. And when you spend that much time in one place you have plenty of staring at the walls to do.  So, it's nice to have a happy uplifting color to stare at. Like gray.

The main bathroom of my house made me happy the first time I entered the room.
You may ask: Really Christy? A bathroom made you happy? What kind of lame-o person are you?
And to that I say: Yes. And: Be nice!
Yes, I was pleased with what I saw because it meant as soon as I signed, it would be mine. In the case of the bathroom it was updated very nicely with a new sink and large cabinet, a new toilet (that may be one of the tallest toilets I've ever...er...know), and a lovely big three door medicine cabinet. But what made me smile specifically was the deep new Jacuzzi tub!  Woo hoo! There were only two things I didn't love about the bathroom: the paint and the vanity light.

The paint was a dull aqua bluish color and the vanity light was ugly. It was a plain rectangular wooden box with 6 light bulbs sticking out across the front of it.

The nice thing about the walls is a beard board and chair rail that goes just under half way up the wall. It's plain white and makes the bathroom look clean and fresh with the white framed medicine cabinet and white tub, toilet and sink. Anyway, I had been looking through Lowe's and Home Depot idea ads and decorating ideas and I saw a bathroom in deep gray, white and purple that I loved! So I started with that.

Now for redoing my bathroom I used those two money saving tips I talked about in the other posts. 1) oops paint and 2) clearance items! I found a quart of paint at Home Depot in the perfect gray color on the oops paint rack. For weeks there were little paint cards in various shades of gray taped along the wall across from the toilet and as time went by I would take down the colors I didn't like to narrow down just which shade I should get. Then suddenly one day I didn't even need those little paint samples; I was able to paint my bathroom for $1 in a color I love!

Mom helped with the painting as well as a few friends (Susen, Jenn and Mike). Mom cut in all around because she is great with that and got it looking good for me! I love the color. There was only one problem. It's very hard to match gray. Kind of like trying to match black or white; seems it would be easy until you have to do it, then you realize just how many shades there really are. So long story short, after taking back many towels and rugs to stores I decided to forget it and use completely different colors. But then the problem was deciding just which color to use. I like so many!

I used them all! Well, a lot of them anyway. There's a multicolored striped shower curtain which my mom gave me as a gift and was used Virginia. There are 4 main towel colors: orange, limey green, aqua blue and deep bright pink which I waited for a sale at JCPenney and got their big fluffy kind. And my newest purchase a double set of orange bathmats on sale for $5. 
Yes, I love that it looks like Crayola exploded in my bathroom! I think it's cheery, especially in the mornings!

That all fixed the problem of the dull colors in the bathroom, but the light fixture still needed help. Thanks again to clearance items and a random trip to wander around the hardware store I found a great replacement for my bathroom light for much cheaper than the original price! A 4 light brushed silver curving light originally $40 was on sale for $10 and amazingly (another one of God's gifts to me!!) there just so happened to be 4 smokey pendant glasses originally $6 on sale for $1.49 each! I snatched them up with a smile and thanked God all the way home!! He'd done it again; given me more than I'd hoped for but for a price I could actually afford!

 Installation: It may be a good time to add a "time saving tip" here. Just because one light fixture was centered how it was hung doesn't mean that a new one will be if you hang it in the same place. Oops. We had to un-install and reinstall it a second time. But with Dan's wonderful help it is back up and in business and well centered!

We also installed 4 great little box shelves. ("We" because I cannot hang anything straight! It's ridiculous! no matter how many times I measure it WILL not line up.) The two biggest are hung normal and the two smallest at an angle to form a diamond shape. I haven't figured out yet what will go in all of them, in one of the little ones I have rolled up wash cloths and in one big one I have perfume bottles. These shelves I bought also on clearance at Target. Originally they were priced at $12 and I got them for $3. Along with other little shelves I got for the hallway, but we will talk about those in the next blog.

All said and done I LOVE my new bathroom! It's bright, modern, and cheery! And so much more fun for just sittin' around in!
Monday, November 15, 2010

Artsy-fartsy

Remember as a kid how fun it was to color? You colored in your picture book, colored on the walls and furniture. Got caught and spanked and told never to do that again... Ah, those were the days.

Well, since my mamma's not here to tell me "no" and it's my house anyway, I am at it again! I drew on my coffee table. OK, so I painted on it, but that doesn't come off as easily.

original look
It's a nice little coffee table that was given to me by a coworker. It's rectangular, light wood and has storage space inside (for board games and photo albums!!) and now has a design on it! I've got a very obvious theme in  my living room; purple! But besides that I have a wall hanging that I just love! It's a big heavy, rectangular piece of wood with tropical type flowers cut out and carved in it and painted silvery gray. I love this piece. I got it some time ago at a used furniture store for $20 and hung it the wall directly across from the front door. 
wall art and glass door


When I first saw it I knew I liked it, but somehow it seemed familiar. It wasn't until much later after moving some things around that I found a cabinet I have and it's glass door with an etching in it. The etching is almost the same as the big art piece hanging on my wall. That art in my mind has become sort of the theme of the room and will be continued on that table.

tracing the design
So, I took the aforementioned table and the wall hanging and paired them up. I placed the art on the table top and with a pencil I traced the flowers where I wanted them on the table. After removing the art I tweaked the tracing a bit to add a petal here and change a petal there. Then came the fun part. With a flat brush I carefully painted the area I'd traced with the same color purple that is on my walls in that room. 

Which leads to this post's  money saving tip! This tip is useful in most areas of life I think. Use your resources! When doing a project (like the artwork on my table) instead of having to match paint colors and nickle and dime yourself with such things as craft store paints; simply use save excess paints from other projects (or in my case entire walls) for use later. I made my table look completely different and it didn't cost me an extra cent!!
beginning of painting

thanks Bentley for not licking the table
It took a couple coats to not be streaky and to match the walls and amazingly enough my overly curious poochie didn't even attempt to lick off the paint!  And now I have a well coordinated artsy-fartsy coffee table!

Monday, November 1, 2010

The red door

The door is red.

No, I'm not talking about communism. I am talking about my front door. It has been painted a deep brick type red as well as the matching house numbers I hand painted. It was fun for me but not so much for the dog. Bentley after having just being bathed was banned from going outside until fully dried. As an alternative to being outside with me he laid by the door breathing heavily into the doorjamb and whining as I painted away. Don't worry, I am not heartless; when he was finally dry and as I began my second coat of paint I allowed him outside with his 8 foot leash caught in the door so he couldn't run off. As a thank you he rolled in the grass collecting all the sand and dead grass on his back that he could.

Painting the door ended up taking a long time (most of the afternoon) for being such a small space. It's a careful job as inevitably people stare at that before they even get to come inside. It's all about first impressions! I used a small foam roller made for doors, trimming and cabinets specifically to not leave streaks. And with such a deep red, many coats had to be applied to ensure even color all over.

The numbers were fun to paint. Positioned directly under the outside light to the left of the door they can be seen even at night. I brought a pen out and drew out the shape and size of the numbers to get an idea before I began painting. I had to thicken them to make them appear bigger so they could be viewed from the street. This took a few tries to get right simply because they seem bigger from close up while painting. So I would stop, walk to the street, and stand at the street for a moment to decide, "the top curve of the 9 and the straight long line of  the 1 should be thicker..." In the end I liked the results and found it relaxing to pretend to be an artist!

Here is the segment of the blog where I give the money saving tip!  
        Two words: oops paint -- Most Lowe's and Home Depot stores have an "oops paint" section in their paint department. It usually consists of small shelving tucked away in a corner or near the paint mixer counters. These shelves will hold any paints that people brought back because they just couldn't get the color quite to their liking. Though, as they say, "one man's trash is another man's treasure!" In this case since the paint is already tinted (and they do not allow changes) it is quite cheap! A $20-25 gallon is usually $5-8 and a $12-15 quart of paint will cost you only $1-5 (Home depot tends to be cheaper for these will the gallons for $5 and the quarts $1. Lowe's varies between brand for oops prices.)

These paints are especially good if you are not sure of the color you want. As in my case with the front door. I often stop by Lowe's or Home Depot on my way home from work in search of any great bargains [see "An Open Door" posting]. So when I peeked at the oops paint and saw a pretty red I figured for $2.50 even if I get home and hate it on the door I can afford to repaint the door and now I have an extra craft paint.